
Manual Handling: Lift Smart, Work Safe
A working guide to moving loads without moving your spine off-line. This module walks through the tips, techniques, and risks tied to transporting material by hand — from the first push of a trolley to the legal duty that sits behind every lifting decision — with diagrams, real worksite scenarios, and the tools crews are using today to cut injury rates.
Spinal Load Gauge — Lift Posture
Compressive force on the L5/S1 disc rises sharply as the load moves away from the body and the spine curves — this module trains you to stay on the left of the gauge.
Proper Lifting Procedure
An illustrated checkpoint reference — the four things an observer looks for when auditing a lift on the floor, mapped straight onto the body.
- Neutral spine, chin tucked
- Knees bent, hips hinge with the knees
- Load held close, elbows tucked
- Wide stable base, feet flat
.
Module Map
Ten blocks, eighty-one sections
Jump to any block — each one builds toward the closing course assessment.
.
Introduction to Manual Handling
12 sectionsManual handling covers any task where a person lifts, lowers, pushes, pulls, carries, or otherwise moves a load using bodily force. It’s still one of the most common activities in aviation ground handling, warehousing, construction, and healthcare — and one of the most under-rated sources of injury.
- What counts as manual handlinglifting a baggage cart tow bar, sliding an equipment case across a ramp, or carrying cable drums to a comms shelter all qualify.
- Who is exposedramp crews, warehouse pickers, maintenance technicians, nurses, and delivery staff are the highest-frequency handlers.
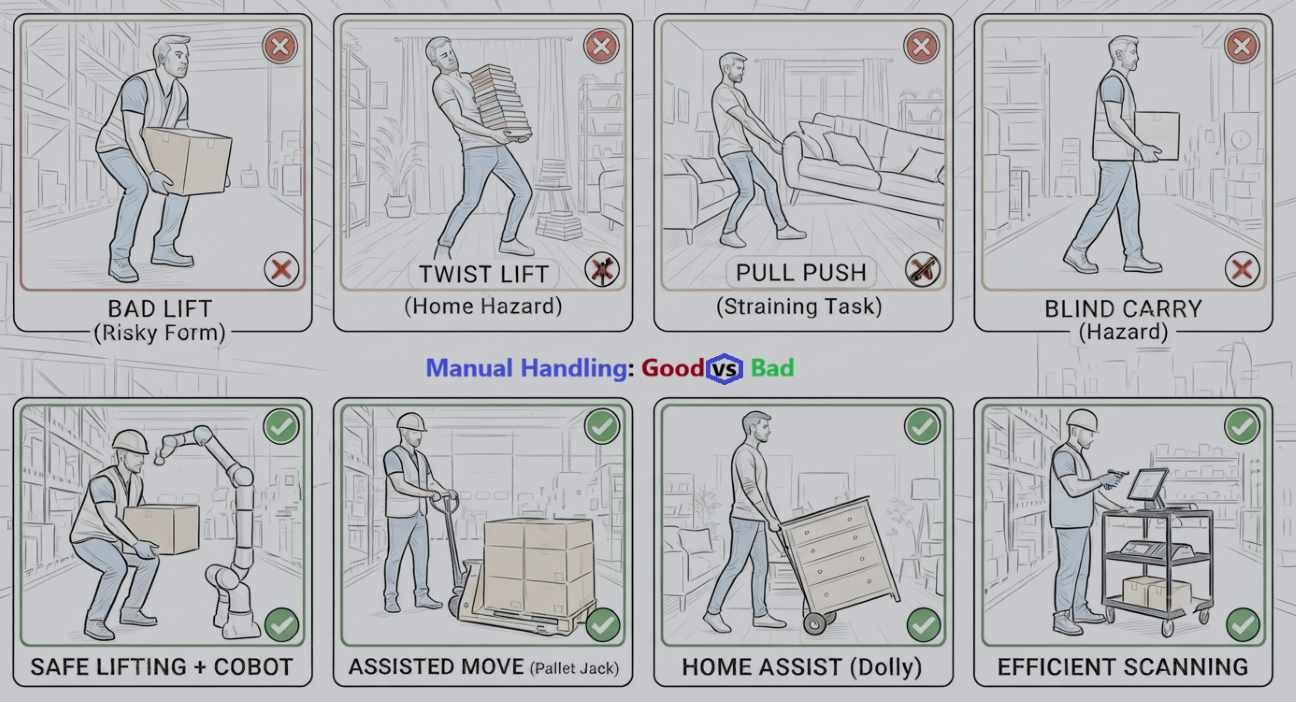
- The hierarchy of controleliminate the lift first, then mechanise, then reduce load/frequency, and train technique last, not first.
- Why it matters economicallymusculoskeletal disorders (MSDs) are consistently among the leading causes of lost work-days across manufacturing and logistics.
- Setting the scene for the moduleevery later block (injuries, assessment, legislation, technique) traces back to the load–task–environment–individual model introduced here.
⇠ swipe to see the full sequence ⇢
Hierarchy of control — read left to right, highest-impact control first.
Latest tools & technology
Manual Handling Injuries and Prevention
9 sectionsHandling injuries rarely come from a single dramatic lift. Most build up from repeated micro-overloads on the same tissue — which is why prevention has to work at the task level, not just the moment of lifting.
- Acute injuriessudden lower-back strain, disc prolapse, and shoulder tears from a single awkward or overloaded lift.
- Cumulative (chronic) injuriestendinopathy, chronic low-back pain, and repetitive strain from repeated sub-maximal handling over months or years.
- Contributing body regionslower back, shoulders, knees, and wrists absorb the majority of reported strain.
- Early warning signsstiffness that doesn’t clear overnight, localized swelling, and grip fatigue are flags, not “normal soreness.”
- Prevention layerstask redesign, mechanical aids, team lifting, job rotation, and warm-up routines, stacked together rather than relied on individually.
⇠ swipe to see the full chart ⇢
Illustrative distribution used for training discussion — verify against your own site’s incident data.
.
Manual Handling Risk Assessments
9 sectionsA manual handling risk assessment breaks a task into four linked factors — Task, Individual, Load, Environment (TILE) — so the assessor can point at exactly what’s driving the risk, instead of guessing.
- Tasktwisting, stooping, reaching, repetition, and insufficient rest between lifts.
- Individualcapability, prior injury, training level, and whether PPE restricts movement.
- Loadweight, size, stability, sharp edges, and whether the centre of gravity is predictable.
- Environmentfloor surface, lighting, temperature, space constraints, and steps or ramps in the route.
- Recording & reviewassessments are dated, signed off, and re-triggered whenever the task, load, or team changes.
TILE model — each arm is scored, and the highest-scoring factor sets the priority for control measures.
Manual Handling Legislation
9 sectionsThe technique matters, but the duty of care is legal, not optional. This block covers the regulatory backbone most handling programmes are built on, and how it maps to typical employer and worker obligations.
Avoid, Assess, Reduce
Avoid hazardous manual handling where reasonably practicable; assess what remains; reduce the risk to the lowest level reasonably practicable.
Follow Systems of Work
Use provided lifting aids, follow trained technique, and report loads, routes, or equipment that fall outside the assessed conditions.
Ergonomic Design Standards
International ergonomics standards for manual handling set recommended mass and force limits used as reference points during assessment.
Documentation Trail
Assessments, training records, and incident reports form the evidence base regulators and auditors expect to see on request.
The Maximum Weight You Can Lift
8 sectionsThere’s no single “safe” number — guideline weights change with lift height, reach distance, and how often the lift is repeated. This block teaches how to read a guideline weight chart rather than memorise one figure.
- Zone-based limitsguideline weights are highest at waist height, close to the body, and drop sharply above shoulder height or below knee height.
- Reach reduces capacitythe same person can safely handle less weight at arm’s length than held close to the torso.
- Frequency reduces capacitya weight that’s fine as a one-off lift may need to be reduced for a task repeated every few minutes.
- Individual variationguideline figures are a starting point for assessment, not a target or a competition.
- Two-person and team liftscombined capacity is not simply additive; coordination and communication reduce the effective safe load.
Guideline lift capacity mapped onto the body — the waist band (cyan) carries the highest guideline weight; shoulder and floor bands (red) carry the lowest.
Risk at Work
10 sectionsRisk at work extends beyond the lift itself to the wider job — housekeeping, traffic routes, weather, and the interaction between manual handling and other hazards on a live site.
- Site-specific hazardsapron-side wind gusts, wet ramps, uneven ground, and vehicle movement around handling tasks.
- Confined and awkward spacesequipment bays, cable trenches, and aircraft holds restrict posture options.
- Concurrent hazardshandling near energised equipment, moving machinery, or at height compounds manual-handling risk.
- Likelihood × severity scoringa simple matrix turns “this feels risky” into a comparable, prioritisable score.
- Dynamic risk assessmentthe on-the-spot judgement a worker makes when conditions differ from the written assessment.
Likelihood × severity — lower-left is acceptable, upper-right needs control before work proceeds.
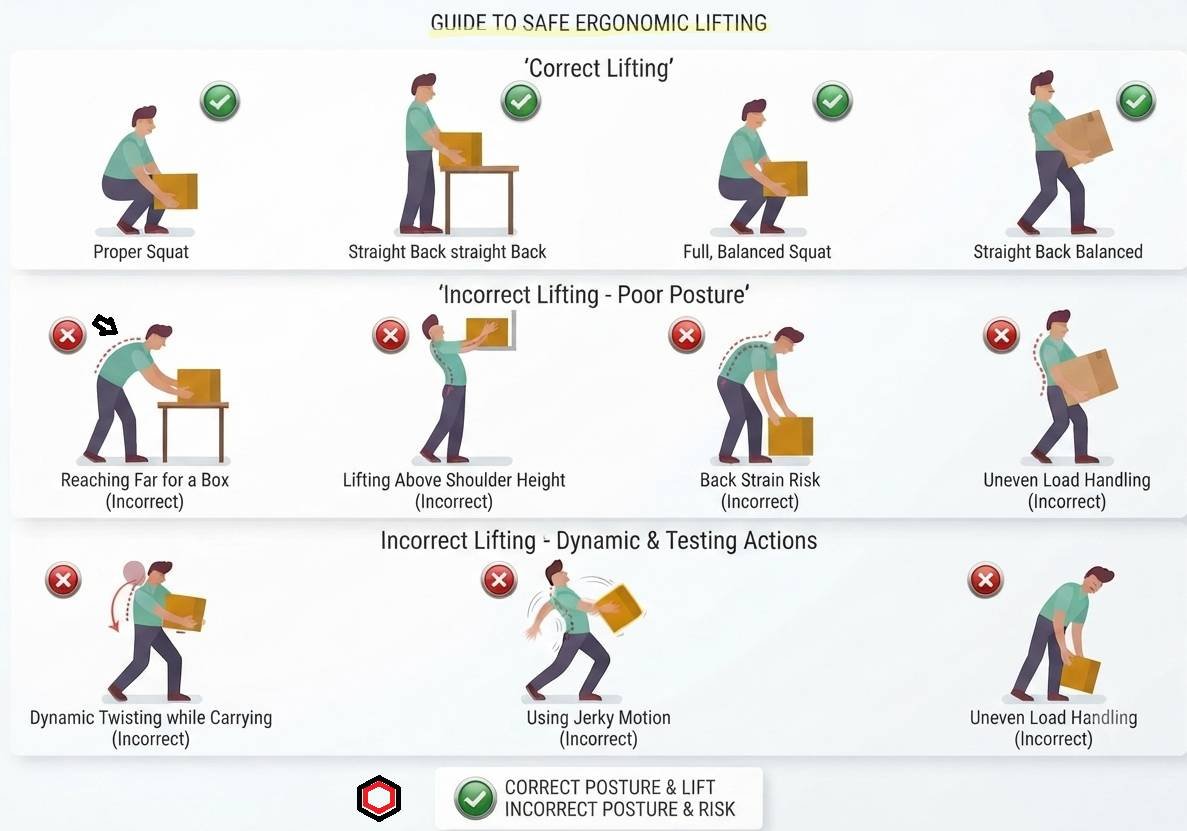
Good Handling Technique
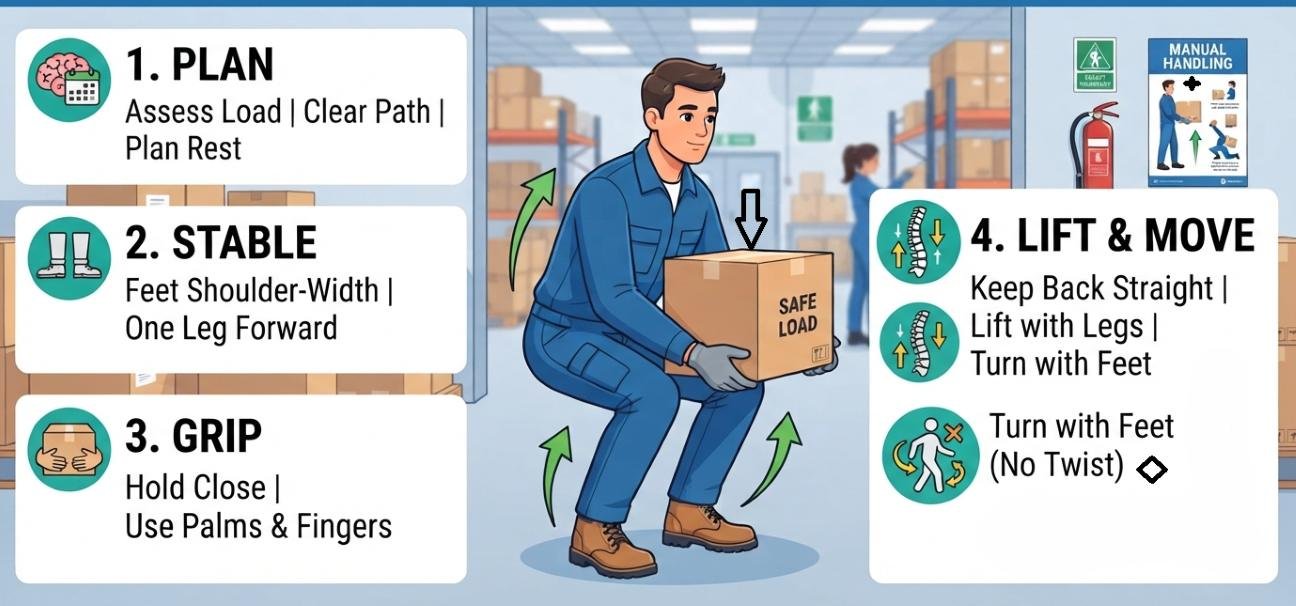
8 sectionsTechnique is the last line of defence, applied after the task and load have already been made as safe as reasonably possible. Good technique is a repeatable sequence, not a single “lift with your legs” reminder.
- Plan the liftcheck the route, clear obstructions, and confirm where the load is going before touching it.
- Position the feeta stable base, close to the load, feet slightly apart in the direction of travel.
- Get a secure gripfull palm contact, not fingertips, and confirm the load doesn’t shift before lifting.
- Keep the load closethe closer the load stays to the body, the lower the force on the spine.
- Lift smoothlybend at the knees and hips, keep the back’s natural curve, and avoid jerking.
- Avoid twistingmove the feet to turn, don’t rotate the spine while loaded.
- Set down with controllower with the same technique used to lift, checking the landing spot first.
⇠ swipe to see all seven steps ⇢
The seven-step technique sequence — each step removes one source of avoidable spinal load.
Manual Handling Tools & Equipment
8 sectionsChoosing the right mechanical aid is the “mechanise” step of the hierarchy of control in practice. This block covers the equipment most sites already have on hand — and exactly how to use each one correctly, not just that it exists.
Sack Trucks & Trolleys
For boxed or bagged loads on level ground.
How to use: tilt back onto the wheel axle, push rather than pull on flat ground, and keep the load stacked low for stability.
Pallet Trucks & Jacks
For palletised freight and equipment crates.
How to use: square the forks to the pallet before pumping, pump the handle fully to lift, and walk — never stand on — the forks while moving.
Hoists, Davit Arms & Cranes
For heavy, awkward, or overhead-height loads.
How to use: confirm the rated capacity before attaching the load, keep bystanders clear of the swing radius, and lower under control — never let the load free-fall.
Lifting Slings & Carrying Straps
For irregular loads without built-in handles.
How to use: check webbing for cuts or fraying before each use, balance the load so it hangs level, and keep the strap angle wide rather than steep.
Conveyors & Roller Tables
For repetitive transfers between fixed points.
How to use: feed loads at a steady pace rather than in bursts, keep hands clear of pinch points at the rollers, and stop the line before clearing a jam.
Grip & Grip-Assist Gloves
For sharp, cold, or slippery loads.
How to use: match glove type to the hazard — cut-resistant for edges, insulated for cold stores — and replace once the grip texture wears smooth.
Future of Manual Handling
6 sectionsThe manual handling of tomorrow looks less like “lift correctly” and more like “the task is monitored, assisted, and redesigned before strain builds up.” This block maps where the technology is heading and what adopting it actually looks like.
Wearable posture & strain sensors
Small IMU-based sensors clipped to a vest or belt flag risky bend/twist angles in real time and log exposure trends per worker for coaching, not discipline.
Passive back-support exosuits
Spring- or elastic-tensioned suits reduce lumbar load on repetitive lifts without needing a power source — useful for warehouse picking and baggage handling.
Powered exoskeletons & cobots
Battery-powered assist suits and collaborative robot arms take on the heaviest or most repetitive share of a task while a person guides placement and precision.
Computer-vision technique auditing
Fixed cameras or phone-based apps score lift technique against the seven-step sequence automatically, turning spot-checks into continuous feedback.
Digital twin task simulation
New workstations and equipment layouts get modelled and risk-scored before anyone lifts anything, catching awkward reach or stoop zones on screen first.
Predictive injury-risk analytics
Aggregated sensor and incident data starts flagging which tasks, shifts, or rotations are trending toward injury before the first report comes in.
How teams are putting this to use
- Start with data, not gadgetsa two-week wearable-sensor pilot on the highest-injury task tells you where an exosuit or cobot actually pays back.
- Pair tech with the hierarchy of controla sensor that just measures bad posture without a mechanical fix behind it only documents the problem.
- Train on the tool, not just the taskan exosuit or cobot changes the technique checklist; retrain the seven-step sequence around the new equipment.
Lesson Summary
2 sectionsTwo closing sections tie the module back together before the assessment.
Module Course Assessment
Eighty-one sections across ten blocks feed into one scored assessment — covering the TILE model, guideline weight zones, the seven-step technique sequence, the tools that back it up, and the legal duties that frame all of it. A pass confirms you’re ready to apply this on a live site.